Introduction
When starting with the cloud, the management console is the first stop to provision, update and manage resources. However, the management console is not the only way to interact with AWS services. Besides the graphical user interface (GUI), you can also interact with AWS programmatically. For automation, interacting with the AWS API is most advisable because every action in AWS is an API call. AWS CLI runs on Linux, macOS, and Windows, and this guide examines how to set up AWS CLI locally on Ubuntu 20.04.
There are several ways to interact with AWS resources:
- AWS Management Console;
- AWS CLI;
- AWS SDKs;
- Infrastructure as Code (e.g. Cloudformation, Terraform).
The AWS Command Line Interface (AWS CLI) is an open-source tool that enables you to interact with AWS services using commands in your command-line shell. With minimal configuration, the AWS CLI allows you to start running commands that implement functionality equivalent to that provided by the browser-based AWS Management Console from the command prompt in a terminal.
At the end of this guide, you will have the AWS Command Line Interface (CLI) installed, configured, and ready to use locally on your Ubuntu machine.
Prerequisites
- You have experience working with the AWS management console;
- You are familiar with the Linux CLI.
Step 1: Setup access keys
Let’s begin by setting up Access keys for the IAM user account. You can use access keys to sign programmatic requests to the AWS CLI or AWS API. Access keys have two parts – an access key ID and a secret access key.
From the AWS management console, search for IAM and choose the first option.

From the IAM Dashboard, select Users and pick your IAM user account. There are no keys associated with this user yet. Navigate to the Security credentials tab and scroll down to Access Keys. Select Create access key.
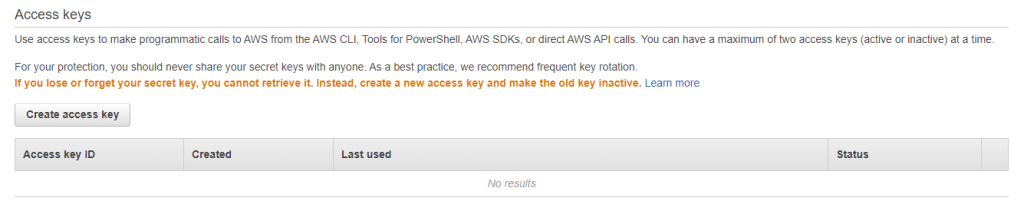
You will get a warning about posting your secret access key in public forums. This is crucial so that you don’t’ expose your AWS account. Also, AWS doesn’t’ store access keys; therefore, it is imperative to have them saved securely. Copy the keys to your clipboard, or download the .csv file to your local drive.

Step 2: Install AWS CLI version 2
Install the latest Ubuntu update.
$ sudo apt updateDownload the installation file from the AWS CLI repository using.
$ curl "https://awscli.amazonaws.com/awscli-exe-linux-x86_64.zip" -o "awscliv2.zip"Unzip and install the files once the download completes.
$ unzip awscliv2.zip && sudo ./aws/installConfirm the installation is completed.
$ aws --versionOutput
aws-cli/2.7.7 Python/3.9.11 Linux/5.13.0-44-generic exe/x86_64.ubuntu.20 prompt/offStep 3: Setup your AWS account
Now that the AWS CLI is installed locally let’s connect to AWS. Run:
$ aws configureYou will be prompted for your Access Key ID; enter the Access Keys you copied earlier.
Output
AWS Access Key ID [*******************]:
Output
AWS Secret Access Key [********************]:You also need to specify a default region and use format us-west-1.
Output
Default region name:
Finally, specify a default output format. There are three output formats to select from – txt. json and table. You may leave it blank.
Output
Default output format:
Note: Inputs are case sensitive, and only lowercase input is supported for the output format. If there is an error in the information you supplied, you may not discover it until you need to run a command.
If this happens, cd into the hidden .aws file in your home directory and delete the config or the credentials file. You can also remove the .aws directory and run aws configure again.
Let’s list all the s3 buckets in the default region.
$ aws s3 lsThe command returns nothing if there are no buckets in the default region.
List your user account details.
$ aws iam list-usersOutput
{
"Users": [
{
"Path": "/",
"UserName": "*******",
"UserId": "********************",
"Arn": "arn:aws:iam::************:user/*******",
"CreateDate": "2022-06-12T16:37:17+00:00"
}
]
}Conclusion
Now that you have the AWS CLI installed, you can connect locally to AWS and create and manage resources using the command line.